related blog
%20(3).svg)
13
Checklist for Scaling Photo Documentation on Big Jobsites
Six-step checklist to standardize jobsite photo capture, embed GPS/timestamps, schedule pre‑concealment shots, assign roles, and build searchable archives.
Managing photo documentation on large construction sites can be overwhelming, but it's critical for reducing disputes, avoiding rework, and saving time. Poor documentation causes 70% of construction disputes and leads to 40% of rework. With the right system, you can cut delays by 31% and administrative costs by 40%.
Here’s a quick breakdown of how to streamline photo documentation:
- Set Fixed Photo Locations: Mark key zones on-site plans to ensure consistent progress tracking and capture concealed elements before they're covered.
- Assign Tasks Clearly: Divide zones and responsibilities among teams to avoid gaps or overlaps.
- Schedule Regular Intervals: Take photos daily or weekly, and document critical systems before inspections or concealment.
- Organize with Metadata: Use timestamps, GPS data, and tags to keep images searchable and credible.
- Leverage Tools: Use apps like CrewCam for automated GPS tagging, real-time updates, and centralized archives.
- Review and Archive: Regularly check photo quality and completeness, then store them in an organized, searchable system.
A structured approach ensures you stay ahead of disputes, save time, and maintain accountability across projects.

6-Step Photo Documentation Checklist for Construction Jobsites
Step 1: Set Up Fixed Photo Capture Locations
Establish permanent photo capture spots throughout your jobsite to ensure consistent photo documentation. This approach not only creates a reliable timeline for tracking progress but also helps resolve disputes. It's the foundation for an efficient system, especially on larger projects.
Identify Key Zones for Regular Photos
Start by pinpointing locations that cover the most critical areas of your site. Perimeter and corner positions are particularly effective. Setting up fixed points at the four corners of your site allows for a natural time-lapse effect, giving you a clear picture of overall progress.
In January 2026, a high-rise project manager set up four fixed positions to capture photos every day at 8 AM. This created a time-lapse record that verified progress and supported billing.
In addition to perimeter shots, focus on pre-construction baselines like adjacent properties, sidewalks, streets, utility markings, and property boundaries. For urban projects, extending documentation 15 to 50 feet beyond the project boundary can help reduce neighbor disputes by up to 60%. It's also important to document active work and staging zones to monitor material deliveries and site flow.
Pay special attention to zones where work will soon be concealed from view. Capture areas like foundations, under-slab utilities, and in-wall systems before they are covered. These photos serve as critical evidence later on . For example, 60% of solar installers and EPCs report having to send teams back to a jobsite to collect missing photos, costing an average of $475 per additional truck roll.
After identifying these key vantage points, mark them clearly on your site plans. This ensures that team members can take photos from the exact same spots, maintaining consistency even if personnel changes occur. Use the "Before/During/After" rule for crucial installations like plumbing or structural welds. This means capturing clear photos before work starts, during the process, and after completion but before the area is concealed.
While focusing on these fixed points, don't forget the importance of documenting both the interior and exterior areas of the jobsite.
Cover Both Interior and Exterior Areas
A complete visual record requires thorough documentation of both inside and outside zones. Exterior areas should include the building envelope, waterproofing, weather barriers, flashing, and roofing penetrations - essential spots where errors or moisture intrusion could lead to costly repairs. Interior areas should cover everything from framing and insulation to final finishes as they progress.
Pay extra attention to high-traffic entry points. Documenting these areas helps track deliveries, monitor personnel movement, and maintain a clear record of site conditions throughout the project. Including measuring tools or objects for scale in your photos adds valuable context when reviewing them later.
| Project Phase | Key Fixed Capture Zones | Key Elements to Document |
|---|---|---|
| Pre-construction | Perimeter, Adjacent Properties | Utility markings, property lines, existing sidewalk/street condition |
| Substructure | Foundations, Under-slab | Rebar, plumbing, and electrical lines before concrete pour |
| Superstructure | Structural Framing, MEP Zones | In-wall mechanical, electrical, and plumbing before insulation/drywall |
| Exterior | Building Envelope | Waterproofing, weather barriers, flashing, and roofing penetrations |
| Close-out | Final Site Condition | Landscaping, drainage, utility shut-offs, and resolved punch list items |
Step 2: Assign Photo Documentation Tasks
After setting up fixed photo capture locations, the next step is to assign clear responsibilities to your teams. Without defined roles, photo documentation can become inconsistent, leading to gaps that might result in disputes or expensive rework. A structured approach ensures the visual record remains complete and reliable.
Assign Zones to Specific Teams
Break your jobsite into 100–250 sq ft zones to guarantee full coverage without overlaps. Assign these zones to specific teams or crew members to avoid duplicated efforts and establish accountability. For example, you might have the electrical subcontractor document all in-wall conduit and junction boxes before drywall installation, while the framing crew captures structural connections and shear walls.
You can also assign tasks by location, shift, or department to ensure the right people are responsible for capturing the right data. On multi-story projects, consider assigning each floor to a different foreman. For sites operating multiple shifts, designate one person per shift to capture progress photos from the fixed points identified in Step 1. This way, you’ll maintain a consistent visual timeline even if team members change.
To make submitting photos easy and efficient, allow field workers to send them via SMS. This method is highly effective since 98% of text messages are read, compared to just 20% of emails.
Define Clear Schedules and Deadlines
Set daily or weekly photo intervals from fixed vantage points and require documentation of critical work before it’s concealed. For instance, mandate routine progress photos every morning at 8:00 AM and enforce deadlines for documenting work, such as capturing images after inspection but before permanent coverage.
"Photo documentation drives accountability and keeps teams honest." - Conner Jones, DroneDeploy
Strict timelines help ensure accountability. For example, plumbing teams should photograph all in-wall systems before drywall installation, and foundation crews must document rebar placement and under-slab utilities before concrete is poured. This approach is crucial since 40% of rework in construction comes from poor documentation of concealed elements. Use digital checklists to confirm that all required photos are taken before crews move on to the next phase. This can help avoid costly return trips, which average $475 per truck roll.
Step 3: Create a Photo Documentation Schedule
Once tasks are assigned, the next step is to establish a timeline for capturing essential photos that aligns with your overall project schedule. By connecting photo documentation to your master construction timeline, you can ensure every critical moment is recorded without missing a beat. This structured approach helps you stay on top of progress and key milestones.
Set Daily or Weekly Photo Intervals
Decide on fixed intervals - whether daily (e.g., 8:00 AM) or weekly - to create a consistent visual record of the project’s progress and any potential delays. Daily intervals are especially useful for summarizing completed tasks and planning the next steps at the end of each workday.
To make these photos more effective, maintain consistent angles and distances for each shot. For example, if you're documenting a multi-story building, take photos from the same corner of each floor every Monday morning. This consistency creates a time-lapse effect, making it easier to track changes week by week. Since construction professionals spend about 35% of their time searching for project documents, organizing photos in this way makes them faster to find and reference when needed.
While routine intervals capture general progress, certain milestones demand more focused attention.
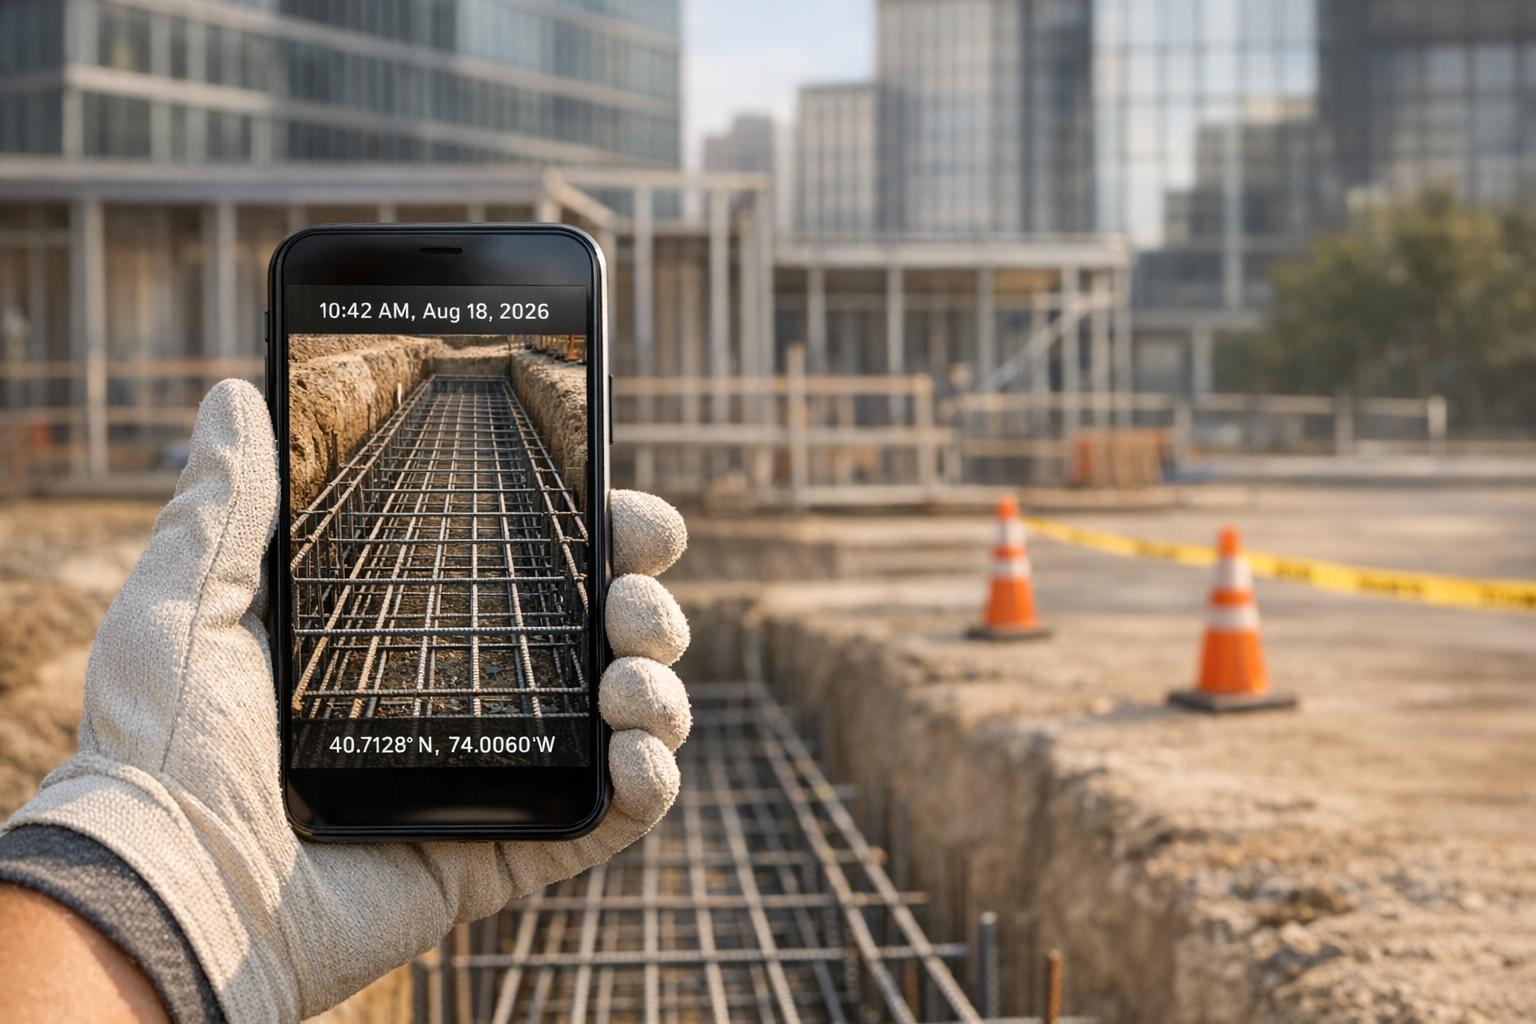
Photograph Critical Systems Before Concealment
Make it a priority to document mechanical, electrical, plumbing (MEP), and structural systems after inspections but before they’re permanently covered. Think of areas like plumbing and electrical systems under slabs, rebar before concrete pours, ductwork prior to ceiling installations, and in-wall components before drywall goes up.
"Progress photo documentation serves as the eyes behind walls, under concrete, and above ceilings - creating permanent records of critical components before they disappear from view." - OpenSpace
To ensure these moments aren’t missed, embed pre-concealment milestones into your schedule. For instance, plan to photograph foundations in the afternoon after inspections are completed but before concrete trucks arrive the next morning. Include reference objects in your photos to maintain a consistent scale. This proactive approach can help cut rework costs by about 25% by identifying potential issues early.
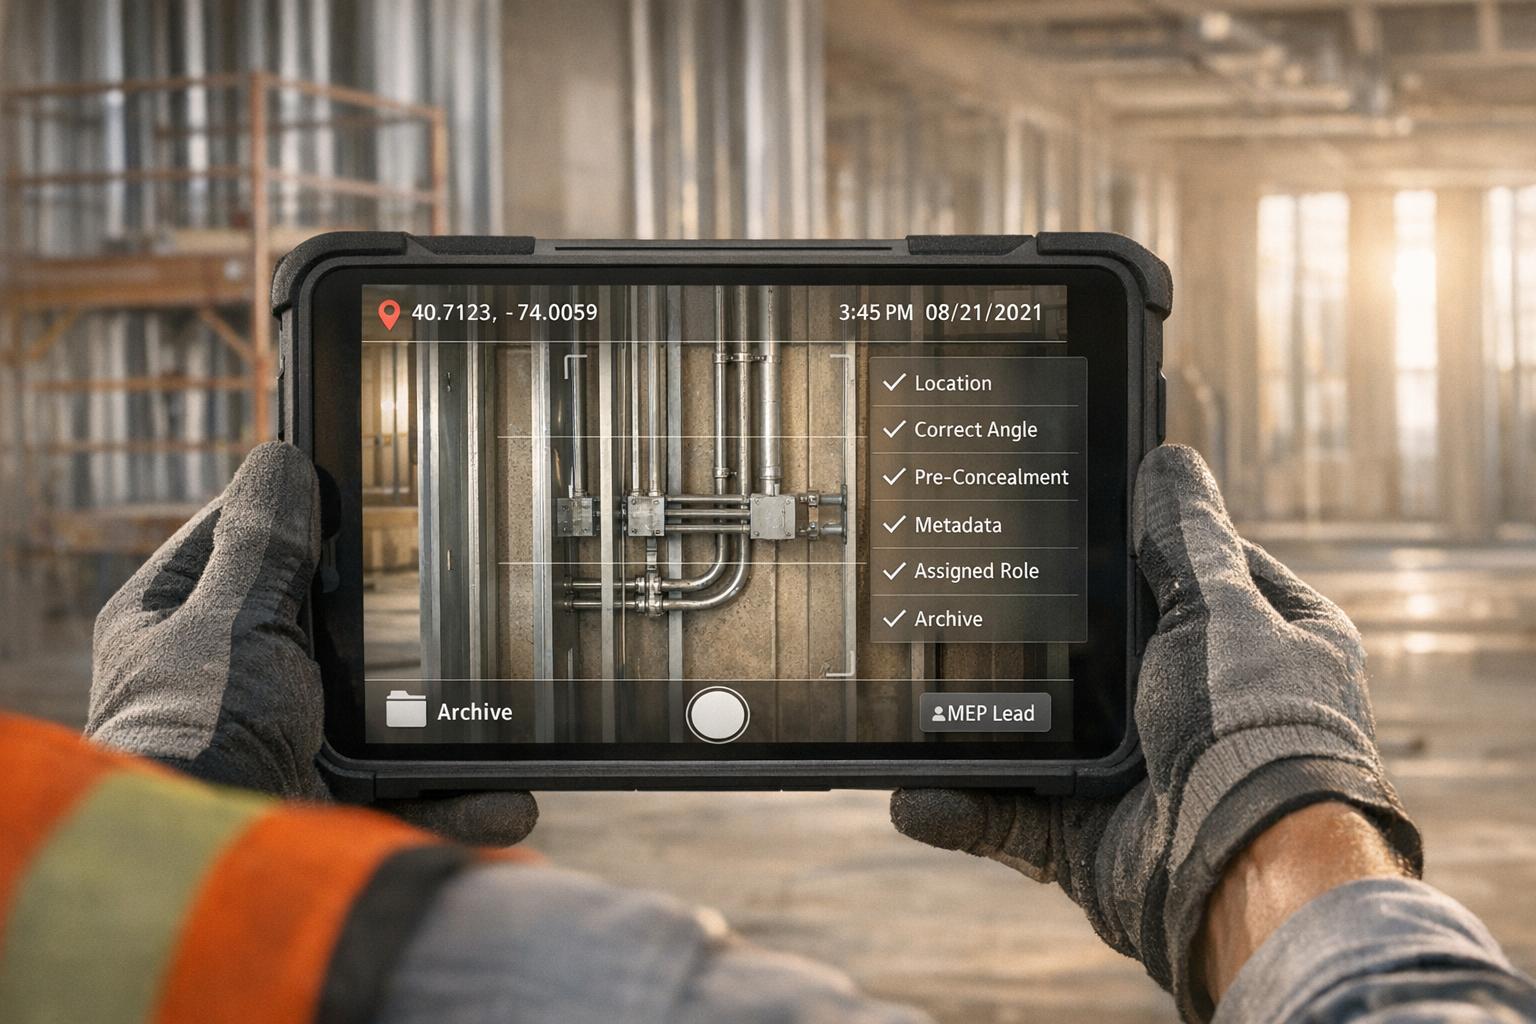
Step 4: Tag Photos with Metadata
Managing images on large jobsites can quickly become overwhelming, especially when dealing with thousands of photos. Tagging and adding metadata bring order to the chaos, turning a sprawling photo library into a searchable and credible archive. Just like fixed capture points and regular schedules are key for consistency, detailed metadata ensures every photo contributes to project accountability. By embedding timestamps, GPS data, and descriptive tags, you create a reliable, searchable record.
Apply Consistent File Naming
A uniform naming system is essential for keeping files organized. Include key details like the date, project name, and a brief subject description. For example, a file named 2026-02-07_SmithProject_Foundation_Pour immediately tells you when and where it was taken, as well as what it depicts - no need to open the file. Pair this with a clear folder structure, where main project folders branch into subfolders for specific phases, such as ElectricalRoughIn or FloorThreeFraming. This setup saves time during client meetings or when resolving disputes.
Add Metadata for Legal and Project Use
Metadata adds another layer of organization and credibility. Embedding timestamps, GPS coordinates, and tags ensures photos are tamper-proof and easy to retrieve. Here’s how each type of metadata contributes to your project:
| Metadata Component | Primary Function | Project Benefit |
|---|---|---|
| Timestamp | Captures the exact date and time of the photo | Creates a chronological record for tracking progress or resolving disputes |
| GPS Coordinates | Logs the geographic location of the photo | Confirms work was completed at the correct site or zone |
| Descriptive Tags | Categorizes photos by subject or project phase | Simplifies searching within large photo collections |
| Annotations | Adds notes or drawings for context | Highlights issues or key details, such as measurements |
Using construction photo apps that automatically add GPS and time data can save time and reduce errors. Adding tags like "electrical", "foundation", or "safety inspection" makes finding specific images a breeze. For compliance and insurance purposes, flagging photos with tags like "critical milestone" or "safety inspection" ensures they’re easy to locate when needed. This approach not only simplifies documentation but also supports efficient archival searches in the future.
sbb-itb-5f4c686
Step 5: Use Technology to Scale Documentation
Automated tools have revolutionized the way documentation is handled, replacing manual processes with efficient, real-time solutions. Modern construction photo apps streamline tasks like adding location data and organizing files, giving your team instant access to project updates. By building on metadata practices, these tools make it easier to scale documentation across projects.
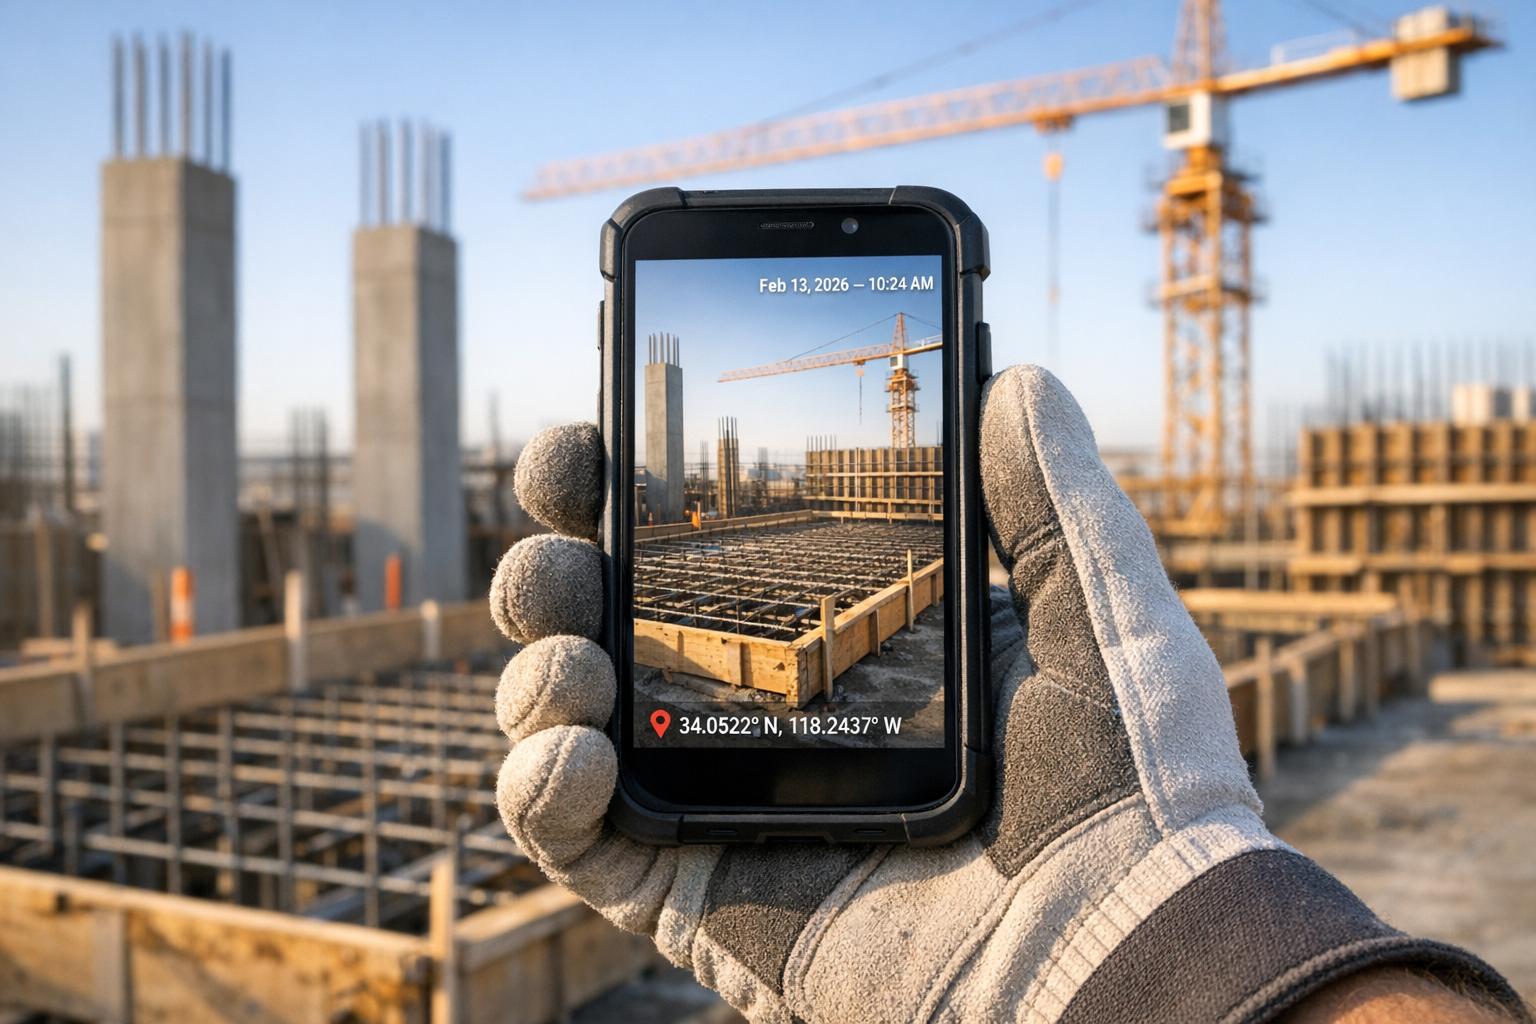
Capture GPS and Time-Stamped Photos
Automatic GPS and timestamp data take the guesswork out of tracking when and where work was completed. For example, CrewCam embeds precise GPS coordinates and time data into every photo, creating a reliable record that’s essential for accountability.
"Timestamps provide a chronological record, while geotags verify the location".
Geotags are especially useful for distinguishing between similar-looking areas. For instance, they ensure that foundation work completed on 02/05/2026 at 9:30 AM in Zone 3 is accurately documented. These automated records become invaluable during safety inspections or when resolving disputes about project quality or timelines.
Share Real-Time Updates with Teams
A live project feed keeps everyone - office staff, supervisors, and subcontractors - on the same page. When field teams upload photos through CrewCam, they instantly appear in the project feed with GPS and timestamp details. This allows distributed teams to monitor progress across various zones without needing to visit each site, saving hours of travel time on large-scale projects. Features like comments and mentions also let team members flag issues directly on photos, whether it’s circling a measurement error or noting a delayed material delivery. This ensures problems are addressed promptly rather than surfacing during weekly meetings.
Organize Work with Checklists and Tags
With automated photo capture in place, real-time project feeds can further streamline collaboration through digital checklists. Teams can create checklists for each phase of a project - like "Electrical Rough-In" or "Third Floor Framing" - and link photos directly to specific tasks. Timestamped photos provide clear evidence of task completion. Tags can also be used to categorize photos by phase or priority, making it easier to build and navigate a searchable archive as the project progresses .
"Effective photo documentation is a cornerstone of successful construction project management. By following these best practices and leveraging modern tools like CrewCam, you can improve accountability, enhance communication, and protect your business from potential disputes".
- Brandon Thompson, Research & Customer Success Specialist at CrewCam
Step 6: Review and Archive Photos
Keeping your photo documentation accurate and reliable requires regular reviews. Weekly checks can help you spot missing images, verify quality, and address inconsistencies before they lead to bigger issues. For high-risk phases, like MEP installations, daily reviews are crucial to ensure essential work is captured before it’s covered up.
With automated capture and metadata tagging in place, consistent reviews and well-organized archives complete an effective documentation process.
Review Photos Regularly
A solid review process ensures your documentation meets all requirements. Use a checklist to confirm GPS data and timestamps are correct, and verify you’ve captured wide shots for context, close-ups for details, and sequential images (before, during, and after) for key milestones. Include details like weather conditions, equipment usage, and safety measures - these can be critical during OSHA inspections or insurance claims.
Image quality is just as important as coverage. Make sure photos have proper lighting, sharp focus, and clear scale references (like a tape measure) to provide context. Compare the photos against project plans to ensure the work aligns with specifications. If anything is missing or unclear, take new photos immediately under similar conditions. Assign team leads to oversee weekly reviews, using shared galleries to gather feedback and maintain consistency.
Once you’ve confirmed the photos meet quality and completeness standards, it’s time to organize them for easy retrieval.
Build Searchable Photo Archives
A well-organized archive saves time and reduces headaches. Use a clear folder structure and consistent file naming system, such as "SiteName_2026-02-07_MEP_RoughIn_001.jpg". This makes locating specific images much easier.
With tools like CrewCam, GPS coordinates and timestamps are automatically embedded, and you can add custom tags for trade type, project phase, and descriptions. This becomes incredibly useful during future renovations or claims. For example, if a leak occurs, you can quickly locate photos showing exactly where plumbing was installed, avoiding unnecessary demolition and cutting down on costs. Unlimited cloud storage and desktop access mean your team can retrieve these archives anytime, turning your documentation into a valuable resource for maintenance, audits, and resolving disputes.
Conclusion
The checklist above highlights the importance of three key elements in photo documentation: consistency, team coordination, and the right technology. By standardizing photo capture - using consistent angles, lighting, and timing - you establish a dependable record that not only tracks progress but also provides essential legal protection. Consider this: inefficiencies in documentation cost the global construction industry an estimated $1.85 trillion, with rework accounting for up to 10% of a project's total value. These numbers emphasize just how critical organized efforts and effective systems are.
Clearly assigning responsibilities helps close documentation gaps and reduces the risk of costly rework, like having to revisit a site unnecessarily. With these principles in place, modern tools take photo documentation to the next level. Technology like CrewCam automates tasks by adding GPS and timestamps, enabling real-time sharing, and creating searchable archives. This ensures your team has immediate access to vital images - whether you're handling a dispute, preparing for an audit, or planning future upgrades.
"Effective photo documentation is a cornerstone of successful construction project management".
- Brandon Thompson, Research & Customer Success Specialist at CrewCam
FAQs
How do fixed photo capture locations help prevent construction disputes?
Fixed photo capture locations offer a dependable way to document site conditions with consistent, geotagged images taken from specific points. This method ensures accuracy and reliability in your records. By photographing the same locations repeatedly, you create a visual timeline that highlights progress and any changes, making it much simpler to address misunderstandings or potential disputes.
This practice also promotes clarity and accountability, providing all stakeholders with a trustworthy record of jobsite conditions over time.
How does metadata help in organizing construction site photos?
Metadata, like GPS coordinates and timestamps, plays a crucial role in managing construction site photos. It ensures that every image is tagged with precise location and time details, making it simple to monitor progress, confirm completed work, and address potential disputes.
With searchable and dependable data, metadata simplifies photo organization and retrieval. This not only keeps your documentation process efficient but also adds a layer of accountability, helping maintain a professional standard.
Why is it important to assign specific photo documentation tasks to team members?
Assigning specific photo documentation tasks to team members ensures that every detail of a construction project is captured methodically. Clear role definitions mean team members know exactly what to photograph - whether it’s site conditions, progress milestones, or safety inspections - which minimizes the risk of overlooking important details.
This system boosts accountability, as photos often come with time stamps and geo-tags, providing reliable records that are essential for tracking progress, resolving disputes, or meeting compliance standards. It also streamlines workflows by preventing duplicate efforts and improving communication across the team. In the end, delegating tasks leads to well-organized documentation, saving time and enhancing project management efficiency.
Related Blog Posts

See CrewCam in action
Start your free trial now by clicking the button below


Wanna chat or demo?
Questions? Concerns? Requests? Talk to a real human

Watch a CrewCam demo now 😎
Short on time, busy, got jobs to do? See how CrewCam works now!