related blog
%20(3).svg)
Marketing
15
7 Essential Photo Documentation Tips for Construction Sites
Effective photo documentation is essential on construction sites, reducing disputes and rework costs while enhancing communication and project management.

Photo documentation on construction sites isn’t optional anymore - it’s a must. Why? It helps reduce disputes, cut rework costs by 25%, and speeds up dispute resolution by 92%. If you’re managing construction projects, here’s how to make your photo documentation process efficient and effective.
Key Takeaways:
- Schedule photos regularly: Capture site conditions daily, during milestones, and at critical phases.
- Use the right equipment: Smartphones for convenience, professional cameras for quality.
- Stay organized: Use clear folder structures and metadata tags to save time.
- Take clear photos: Mix wide-angle, mid-range, and close-up shots for full coverage.
- Add notes: Annotate photos with measurements, issues, and progress details.
- Link photos to tasks: Match images with milestones, RFIs, and punch lists.
- Leverage software: Automate organization, timestamps, and sharing for efficiency.
Quick Comparison: Smartphone vs. Professional Camera
| Feature | Smartphone Cameras | Professional Cameras |
|---|---|---|
| Image Quality | Good in bright light | Superior in all lighting |
| Portability | Highly portable | Bulky, needs extra gear |
| Cost | Affordable | Expensive |
| Sharing Capability | Instant sharing | Requires file transfers |
| Durability | Less rugged | Often weather-sealed |
1. Set Up Regular Photo Schedules
Keeping a consistent photo schedule is key to maintaining accurate records and staying on top of your project's progress.
Define Key Photo Checkpoints
Identifying specific stages for photo documentation ensures you cover all critical aspects of your construction project. Here are some essential checkpoints to consider:
| Project Stage | What to Document | How Often |
|---|---|---|
| Pre-construction | Site conditions and any existing structures | Daily |
| Foundation Work | Pouring sequences and reinforcement placement | Every 2–3 hours during active work |
| Structural Framing | Installation of steel or wood frameworks | Daily, plus milestone updates |
| MEP Systems | Routing and pre-closure details | At each installation phase |
| Final Punch List | Completed work and quality checks | Per inspection area |
For fast-moving work, consider capturing photos every 30 seconds to 1 minute. For projects requiring long-term monitoring, intervals of 5–10 minutes strike a balance between detail and battery efficiency.
These checkpoints help establish a disciplined approach to documentation, forming the backbone of a reliable daily routine.
Set Up Schedule Reminders
To ensure consistency, integrate photo-taking into your daily workflow:
- Morning: Take photos of the site's initial conditions.
- Milestone Moments: Document significant phase completions throughout the day.
- End-of-Day: Capture progress made and ensure the site is secure.
For longer projects that span several months, a photo interval of at least 5 minutes is recommended. This approach helps conserve battery life while still providing a thorough visual record.
2. Choose the Best Camera Equipment
Phone Cameras vs. Professional Equipment
When deciding between smartphone cameras and professional equipment, it’s all about weighing convenience against performance. Smartphones are perfect for quick, portable shots, while professional cameras excel in delivering high-quality images, especially in tricky lighting situations.
| Feature | Smartphone Cameras | Professional Cameras |
|---|---|---|
| Image Quality | Good in bright conditions | Superior, especially in low light |
| Portability | Extremely portable | Bulkier; may need extra gear |
| Sharing Capability | Instant sharing | Requires file transfers |
| Cost | More affordable | Often a major investment |
| Durability | Less rugged | Often weather-sealed |
| Zoom Capability | Limited digital zoom | Extensive optical zoom options |
"The number of megapixels isn't the whole story. You need to look at the lens quality and how well the sensor and lens are matched to produce sharp, clear images with minimal distortion."
Photo Quality Requirements
Capturing high-quality images isn’t just about aesthetics; it’s about meeting both legal and practical standards. The right equipment can make all the difference.
Key Equipment Features:
- Wide-angle lens: Ideal for photographing large structures or spaces.
- Tripod compatibility: Keeps your shots steady and sharp.
- Weather resistance: Essential for outdoor shoots in unpredictable conditions.
- High-resolution sensor: Captures fine details clearly.
- Low-light performance: Crucial for dim environments or evening shots.
Lighting Tips:
"Adequate lighting is essential for good image quality in photos, especially for the smaller sensors in almost all 360 cameras. In low light, you can improve the quality of your 360 photos by using a LED light."
Technical Considerations:
- Ensure the resolution is high enough to capture intricate details.
- Have sufficient storage and a reliable backup system for your files.
- Opt for equipment with long-lasting battery life to avoid interruptions.
For construction documentation, professional cameras are often the go-to choice for their performance under challenging conditions. However, modern smartphones can step in as handy backups or for quick sharing. Selecting the right gear doesn’t just enhance photo quality - it also ensures a smoother, more dependable documentation process.
3. Keep Photos Organized
Establish Clear Folder Structures
Keeping construction site photos well-organized can save time and prevent costly mistakes. Did you know that construction professionals spend 35% of their time searching for information? On top of that, teams lose 9.1 hours each week digging through unorganized project photos. A clear folder structure can eliminate this inefficiency.
Here’s a simple folder system to follow:
| Level | Structure | Example |
|---|---|---|
| Primary | Project Name | "2025_MainStreetComplex" |
| Secondary | Construction Phase | "Foundation_Phase" |
| Tertiary | Date + Location | "05192025_WestWing" |
| Tags | Trade | "Electrical_Rough-in" |
By sticking to this approach, you can cut delays by 31% and reduce administrative costs by 40%. To keep things consistent, avoid using special characters in folder names - stick to alphanumeric characters, underscores, and hyphens instead.
But folders are only part of the solution. Adding photo tags can turn your archive into a powerful, searchable database.
Use Photo Tags and Data
While folders provide structure, photo tagging adds another layer of efficiency by making images instantly searchable. Key metadata to include in your tags are:
- Date and time stamps
- Location coordinates
- Construction phase
- Trade categories
- Quality checkpoints
- Safety compliance markers
For instance, one facilities team saved $120,000 by using tagged photos to prove that flooring was installed at 17°F, far below the required 40°F minimum. This kind of detailed tagging can be a game-changer.
Here’s what you stand to gain with a well-organized photo system:
- 93% faster photo retrieval thanks to standardized naming
- 92% fewer disputes when systematic photo evidence is used
- 25% reduction in rework costs by catching issues early
To keep your system running smoothly, schedule monthly maintenance to remove outdated files and ensure naming conventions are followed. A little upkeep goes a long way!
4. Take Clear, Complete Photos
Once you've sorted out scheduling, chosen the right equipment, and gotten organized, the next step is all about capturing clear, effective photos.
Balance Overview and Detail Shots
To fully document a site, you need a mix of wide, mid-range, and close-up shots. Here's a quick guide to getting it right:
| Shot Type | Purpose | Best Practices |
|---|---|---|
| Wide-Angle | Show site context and progress | Keep the camera level, get low for perspective, and include objects for scale. |
| Mid-Range | Document specific work areas | Take shots from multiple angles to show spatial relationships. |
| Close-Up | Highlight technical details | Use good lighting and ensure sharp focus for clarity. |
Wide-angle shots are especially useful for giving context. Position them to highlight key elements of the site. As Matt Miller, Director of Emerging Technologies at Iowa DOT, puts it:
"With augmented reality, you're standing there and holding up the iPad or iPhone and seeing what is right in front of you and the model overlayed directly to your specific location. That way you can see not only what is there, but what is going to be there when the project is completed".
Including familiar objects like tools or workers in your shots helps provide a sense of scale. Mark S., a Senior Superintendent, explains:
"It's helpful, especially with these tighter spaces. It makes the trade partners plan better".
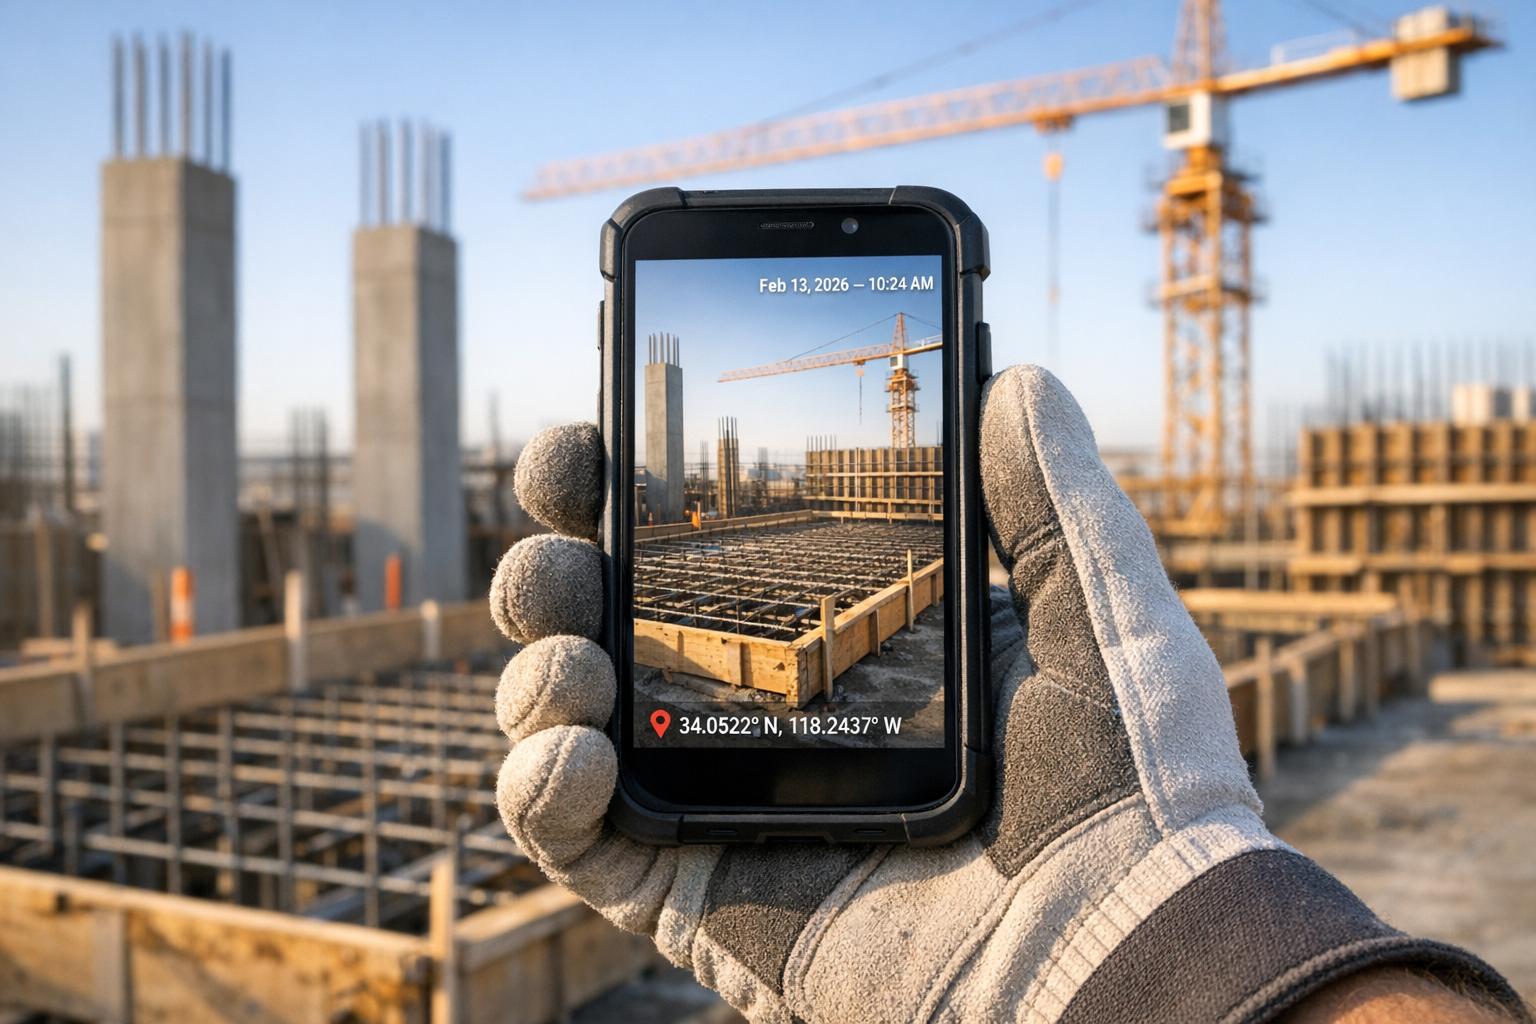
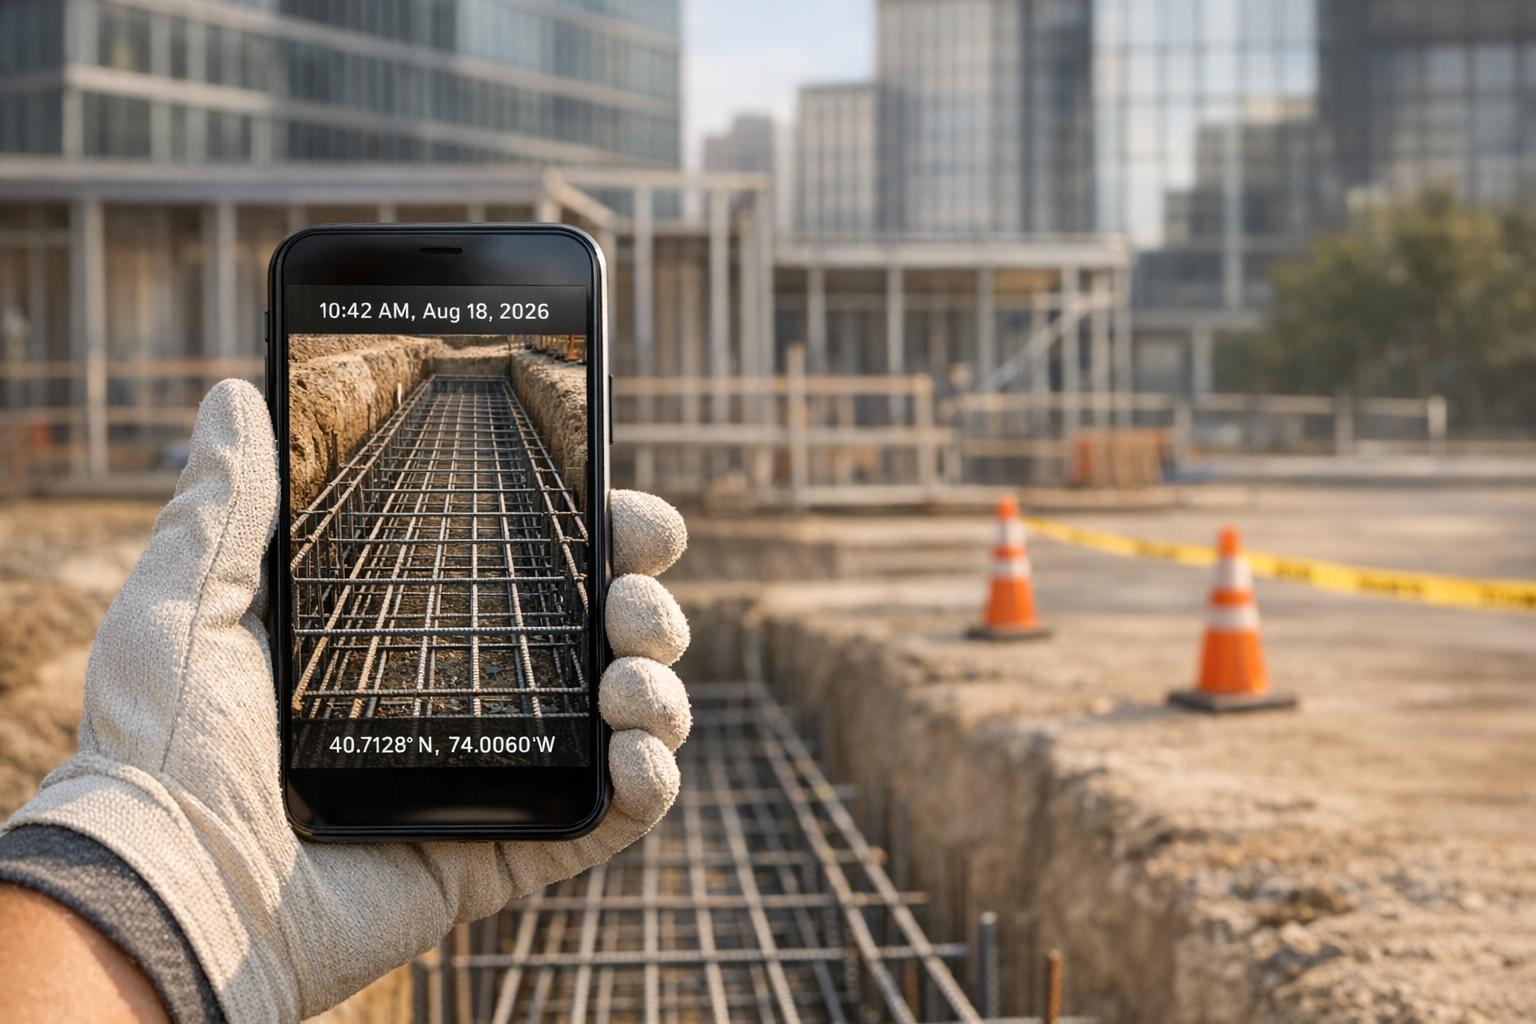
Adding precise location details to your photos makes them even more valuable.
Record Location Data
Once you've captured all the necessary details, make sure to attach accurate location data to your images. This step is crucial for maintaining documentation accuracy. The global GIS market is expected to grow by $21.57 billion by 2028, highlighting the increasing importance of location-based tools.
Here are some tips to get the most out of your photo documentation:
- Use the GPS feature on smartphones - most workers already have them on hand.
- Record weather conditions alongside location data to support any potential delay claims.
- Leverage augmented reality tools to overlay digital models onto real-world environments.
Cedric Wilkinson, an Engineering Technician Senior at Iowa DOT, highlights the benefits of these tools:
"This tool is a way to quickly and easily get information back to the people who need it. It's effective and very accurate".
For example, in February 2024, Iowa DOT introduced augmented reality combined with mapping software to improve construction visualization. By integrating geographical data with digital models, field inspectors could document measurements and send updates to designers in real time. This approach not only enhanced communication but also improved safety and efficiency on project sites.
sbb-itb-5f4c686
5. Add Notes to Photos
Clear and organized photo documentation is a great start, but adding detailed notes takes communication to the next level. When you annotate construction photos, they become powerful tools for collaboration and clarity.
Mark Up Important Details
Annotations add context and meaning to photos, making it easier for teams to understand and act on the information. Here's how different types of annotations can help:
| Annotation Type | What to Include | Purpose |
|---|---|---|
| Location Details | Room name, floor number, compass direction | Helps teams quickly identify the area |
| Technical Info | Measurements, material specs, equipment details | Documents specifications and ensures compliance |
| Issue Markers | Arrows, circles, text highlighting problems | Pinpoints areas needing attention |
| Progress Notes | Completion status, quality checks | Tracks milestones and quality |
"Ensure that annotations and notes are clear, concise, and easy to understand. Use simple language and standardized symbols to convey information effectively to all project stakeholders".
To make your annotations as effective as possible:
- Combine metadata with location and contextual details.
- Include exact measurements and clear descriptions.
- Stick to standardized symbols for consistency.
Use Photo Markup Tools
Digital markup tools make it easy to annotate photos and highlight specific areas directly. They improve communication by visually guiding teams through important details.
For instance, in landscaping projects, annotated images with notes like "cut here for drainage trench" or "shift bed approximately 3 ft left" have been shown to reduce errors and improve accuracy.
To maximize the benefits of photo markup, construction teams should follow these best practices:
| Best Practice | Implementation | Result |
|---|---|---|
| Consistent Symbols | Use standard arrows, circles, and text styles | Minimizes confusion across teams |
| Clear Labeling | Add specific measurements and directions | Ensures precise execution |
| Organized Storage | Save marked photos with searchable titles | Makes referencing quick and easy |
| Version Control | Track changes and updates to markups | Keeps records accurate and up-to-date |
Recent statistics highlight the impact of digital annotation tools:
- A 30% drop in on-site visits.
- A 20% reduction in project timeline overruns.
- Improved safety compliance through annotated site photos.
"Annotations and notes clarify complex details, dimensions and specifications that might not be clear from symbols alone. This reduces misinterpretations and ensures everyone involved understands the project intent".
6. Connect Photos to Project Tasks
Adding photos to project tasks isn't just about keeping records - it’s about turning visuals into actionable insights that drive progress.
Linking photos directly to tasks transforms images into tools for better decision-making. This integration helps avoid disputes and keeps project management running smoothly.
Match Photos to Work Items
Pairing photos with specific work items and milestones can significantly improve efficiency. Here’s how different photo-task connections can enhance project management:
| Task Type | Photo Documentation Needs | Benefits |
|---|---|---|
| Daily Reports | Time-stamped progress photos | Provides a visual audit trail |
| RFIs | Detail shots of specific issues | Speeds up problem resolution |
| Punch Lists | Before/after completion photos | Confirms task completion |
| Milestone Updates | Comprehensive site views | Tracks key progress milestones |
For instance, in February 2023, Arco/Murray Design Build used drone photography to document a panel tilt milestone for the Bibb Garrett Road project in Tanner, Alabama. The drone images offered clear visual proof of proper wall installation, reducing ambiguity.
By catching potential issues early, quality photo documentation can cut rework costs by 25%. To make the most of photo-task integration:
- Use consistent, descriptive photo names (under 25 characters)
- Include key details like date, location, and task references
- Link photos to relevant drawings or RFIs
- Add time stamps to create an audit trail
Once photos are properly matched to tasks, sharing them efficiently keeps everyone on the same page.
Share Photos with Teams
Sharing photos effectively ensures all stakeholders stay informed and aligned. Clear protocols for sharing task-related images can make a big difference:
| Sharing Level | Access Requirements | Communication Goals |
|---|---|---|
| Field Teams | Real-time mobile access | Supports immediate action |
| Project Managers | Daily progress updates | Aids scheduling and planning |
| Stakeholders | Weekly milestone photos | Enables oversight and approvals |
| Quality Control | Detailed inspection images | Ensures compliance verification |
To simplify photo sharing across teams:
- Use a centralized platform for universal access
- Set photo quality standards to maintain consistency
- Define sharing protocols tailored to each stakeholder group
- Organize photos in folders by date and milestone
With these practices in place, photo sharing becomes an integral part of smooth project communication.
7. Use Construction Photo Software
Using dedicated photo software on construction sites can completely change how photos are captured, organized, and utilized. These tools not only streamline the documentation process but also improve project efficiency by ensuring everything is well-organized and easy to share.
Simplify Photo Management
Smart photo software can save you a ton of time - up to 9 hours a week - by cutting photo search efforts by 82%. These digital tools make documentation faster and more efficient with features like:
| Feature | Benefit | Time Savings |
|---|---|---|
| Automated Time Stamps | Instantly verify photos with timestamps | 93% faster retrieval |
| Location Tagging | Automatically geo-tags photos for precise site mapping | – |
| Smart Organization | Automatically categorizes photos | 82% less time spent filing |
| Real-time Sharing | Instantly shares photos with the team | – |
By standardizing photo naming and automating organization, these tools allow field teams to retrieve photos 93% faster. This efficiency helps address a significant issue in the U.S. construction industry, where quality control failures cost an estimated $31.3 billion annually.
For example, a project manager once discovered major wall construction errors - some as severe as 31 inches - during a routine photo review. Thanks to automated documentation, the issue was caught early, avoiding structural problems and potential legal disputes with neighboring properties.
But it’s not just about saving time; these systems also ensure your records are secure.
Keep Photos Safe and Accessible
Digital storage solutions protect your project documentation and reduce the risk of disputes. Key features include:
- Cloud-based storage with automatic backups to keep records safe
- Role-based access controls to manage who can view or edit files
- Mobile-friendly interfaces for on-the-go access
- Offline mode for areas with no internet connection
- Integration with project management tools for seamless workflows
The benefits of photo documentation software go beyond convenience. These tools can lead to:
- A 31% decrease in project delays
- A 40% cut in administrative costs
- A 65% drop in quality control-related losses
- A 25% reduction in rework expenses
From better organization to cost savings, construction photo software is a game-changer for keeping projects on track and under budget.
Conclusion: Better Construction Photo Management
Organized photo documentation has proven to be a game-changer in project management, helping to minimize delays, reduce rework, and lower overall costs. In the U.S. construction industry, where quality control failures rack up a staggering $31.3 billion annually, using effective photo documentation can slash these losses by 65% through faster issue identification and resolution.
"Site photo documentation stands as the strongest defense against these costly conflicts, creating an undeniable visual record of project progress and quality." - Claudia Thijs, OpenSpace
The financial benefits of better photo management ripple across multiple aspects of a project:
| Area | Impact | Cost Reduction |
|---|---|---|
| Rework Expenses | Early issue detection | 25% |
| MEP Maintenance | Better system documentation | 30% |
| Administrative Time | Streamlined photo management | 40% |
| Quality Control Losses | Improved oversight | 65% |
These savings not only cut costs but also improve how smoothly projects run. Jessica Ferrell from Horst Construction emphasizes the importance of visual tools in construction:
"As with so many cliché phrases, there is truth behind the phrase 'a picture is worth a thousand words.' In construction, the constantly evolving technology that captures both still images and video are invaluable tools"
FAQs
How does photo documentation help reduce rework costs and resolve disputes in construction projects?
Photo documentation plays a key role in cutting down rework costs and settling disputes by offering a clear, time-stamped visual record of jobsite progress and conditions. With this tool, teams can spot and address issues early, stopping minor mistakes from snowballing into expensive fixes. In fact, studies indicate that using photo documentation effectively can lower rework expenses by as much as 25%.
Beyond cost savings, maintaining a detailed visual archive strengthens communication among stakeholders, minimizes misunderstandings, and provides solid evidence when disputes arise. This proactive method not only boosts accountability but also builds trust and ensures smoother project management from beginning to end.
What are the benefits of using professional cameras instead of smartphones for documenting construction sites?
Professional cameras bring some clear advantages when it comes to documenting construction sites. One standout is image quality. Thanks to their larger sensors, they handle low-light situations better and capture a wider range of light and detail, ensuring sharper and more vibrant photos.
Another big plus is the ability to use interchangeable lenses. Whether you need wide-angle shots to capture an entire site, close-ups for intricate details, or something in between, professional cameras give you the flexibility to adapt to different scenarios with precision.
These cameras also deliver high-resolution images and support RAW file formats. This makes post-processing much easier, allowing you to fine-tune and enhance your photos without losing quality. On top of that, their manual controls let you adjust exposure, focus, and other settings to get exactly the shot you need - something smartphones often struggle to match.
For creating dependable, detailed, and professional photo records of your construction projects, a professional camera is hard to beat.
How can photo documentation software improve efficiency and reduce costs on construction projects?
Photo documentation software transforms the way construction teams operate by making communication smoother and problem-solving quicker. With real-time visual updates, teams can identify and tackle issues early, helping to avoid expensive delays or rework. For instance, having clear photo records allows teams to catch problems before they escalate, significantly reducing rework costs - one of the biggest culprits behind project budget overruns.
Beyond problem-solving, these tools simplify administrative tasks like organizing and retrieving project photos. This means less time spent on sorting through files and more time dedicated to getting the job done. By keeping everything organized and promoting accountability, photo documentation software boosts productivity and helps ensure projects stay on schedule.
Related Blog Posts

See CrewCam in action
Start your free trial now by clicking the button below


Wanna chat or demo?
Questions? Concerns? Requests? Talk to a real human

Watch a CrewCam demo now 😎
Short on time, busy, got jobs to do? See how CrewCam works now!